About

WELCOME! Get Latest Tricks n Tips About Computers, Facebook, Internet and Everything Related...
Showing posts with label Browser. Show all posts

Saturday, August 10, 2013

Internet Error Codes

Error 400 - Bad request.
Error 401 -unauthorized request.
Error 403 - forbidden.
Error 404 - Not found.
Error 500 -Internal error.
Error 501 - Not Implemented
Error 502 - Bad Gateway
Error 503 -Service unavailable.
Error 504 - Gateway Time-Out.
Error 505 - HTTP Version not supported/DNS Lookup Fail/ unknown host.
Error 500-599 - Server Errors.

Top 5 Countries with world’s fastest internet


1. Hong kong
Speed: 63.9 Mbps 
It has the worlds fastest internet speed. It has blazing fast internet, an average peak speed of
63.6 Mbp megabits per seconds. At this speed you can download HD movie in about 2 minutes.

2 Japan
Speed: 50 Mbps
The home of Nintendo and Sony had the second fastest internet speed, thanks to the

high-speed fibre optics that run through many parts of the island nation. Japan’s average peak
broadband speed reached an impressive 50 Mbps, which was more than 170% faster than the
 global average

3 . Romania
Speed: 47.9 Mbps
When last checked in on Romania,it was ranked No. 5 and was the only country to see its

average fall from the previous quarter. The country is now back on track, andhas elevated
itself with an averagepeak speed of 47.9 Mbps. That’s 160% faster than the global average
Romania’s average was 9% higher than the previous quarter

4. South Korea
Speed: 44.8 Mbps
Serious PC gamers who want to dominate in StarCraftneed fast, low latency internet connections. 

They’ll find that in South Korea, home to consumerelectronics giants Samsung and LG. The 
country’s average peak hit 44.8 Mbps, about 143% faster than theglobal average. It was the 
only region to lose speed compared with a year ago,

5. Latvia
Speed: 44.2 Mbps
Smaller countries are easier to blanket with high-speed internet, which is one of the reasons

 why Latvia consistently ranks high on this list. The average peak broadband speed was 
44.2 Mbps, about 140% faster than the globalaverage

Monday, July 22, 2013

How to Enable/Disable Java Script in Browser

Enable JavaScript in the Chrome
To enable JavaScript in chrome browser, first we find the  customize and control Google chrome setting symbol and click on that.


From the drop down menu, we select the settings option at the bottom of the settings page we find show advanced settings options click on that.

Then open privacy and other settings, under the  privacy settings we have one button that is content settings click on that button. 

Then open a content setting page,  we find one option that is JavaScript.

To enable JavaScript
                  
                   check to allow all sites to run JavaScript (recommended) option. 
                   To disable JavaScript check do not allow any site to run JavaScript. 
                   Then press ok button.

Sunday, July 21, 2013

Turn On Google Chrome For Penetration Testing Tool-19 Extensions


Google Chrome is the most popular web browser of the world. It’s light weight and comes with a clean interface. This is the main reason of its popularity. It also has various other features that make website browsing easy and faster. Like Firefox, Chrome also supports add-ons but called extensions for Chrome. Extensions help us in improving the functionality of Google Chrome. There are thousands of Google Chrome extensions available that add nice tools directly in the browser and reduce the need of installing separate tools for those works. In previous posts, we have covered the Firefox add-ons that make Firefox a security testing tool. Like Firefox, we can also make Google Chrome a security tool with the use of some nice security extensions.
In this post, I have collected all those extensions that help us in the penetration testing process. All these extensions are available for free to download from Google Chrome’s Web store. Few extensions are not available unofficially. So, you need to download from their official website.
Note: Description of tools taken from Official Release Note:
Google Chrome Extensions for Security researchers and penetration testers,

Turn your Google Chrome into Penetration Testing Tool-19 Extensions:

1) Web Developer:
Web Developer is a Google Chrome extension that adds a tool bar with various web development tools in Chrome. With these tools, users can perform various web development tasks. This extension helps analyzing web application elements like HTML and JS.

  • Add Web Developer Extension in Chrome Here.

2) Firebug Lite:
Firebug Lite for Google Chrome, provides a rich visual environment to analyze HTML elements, DOM elements and other Box Model Shading. It also provides live CSS editing. It helps in analyzing how an application is working on the client’s side.

  • Add Firebug Lite to Google Chrome Here.

3) d3coder :
d3coder, is another nice Google Chrome extension that helps penetration testers. It enables us to encode and decode selected text via context menu. Thus it reduces the time to encode and decode strings by using separate tools. This extension can perform a wide range of functions. See the list below:
  1. Timestamp decoding
  2. rot13 en-/decoding
  3. base64 encoding
  4. base64 decoding
  5. CRC32 hashing
  6. MD5 hashing
  7. SHA1 hashing
  8. bin2hex
  9. bin2txt
  10. HTML entity encoding
  11. HTML entity decoding
  12. HTML special chars encoding
  13. HTML special chars decoding
  14. URI encoding
  15. URI decoding
  16. Quoted printable decoding
  17. Quoted printable encoding
  18. Escapeshellarg
  19. Base64 decode
  20. Base64 encode
  21. Unserialize
  22. L33T-en/decode
  23. Reverse

  • Add d3coder extension to Google Chrome Here.
4) Site Spider:
Site Spider, is an extension that adds a crawler in Chrome. It crawls all pages and reports all broken links. One can also restrict the spider by adding restrictions and regular expressions, it works at the client’s side. It can also use your authentication to access all pages. This extension is opensource. So, you can easily modify it according to your needs.
  • Add Site Spider to Google Chrome Here.
5) Form Fuzzer:
Form Fuzzer, is used to populate predefined characters into different form fields. It can also select checkboxes, radio buttons and select items in forms. It has a configuration menu where you can manage all settings of the extension. It is really helpful in testing forms. You can set payloads for forms and then populate payloads quickly with this nice tool. Really helpful in performing XSS and SQL injection attacks.

  • Add Form Fuzzer to Google Chrome Here.
6) Session Manager:
Session Manager, is a powerful Chrome extension that lets users save, update, restore, and remove sets of tabs. You can create a group of tabs of the same interest and then restore those pages in one click. If you open few specific pages daily, and create groups of those pages and then open with a single click.

  • Add Session Manager to Google Chrome Here.
7) Request Maker:
Request Maker, is a core penetration testing tool. It’s used in creating and capturing requests, tampering the URL, and making new headers with post data. It can capture requests made via forms or XMLHttpRequests. You can see the function of this tool is similar to Burp. It’s also helpful in performing various kind of attacks in a web applications by modifying http requests.

  • Add Request Maker to Google Chrome Here.
8) Proxy SwitchySharp:
Proxy SwitchySharp, is a proxy extension that helps in managing and switching between multiple proxies quickly. It also has an option to set auto proxy switching based on URL. You can also import or export data easily. With proxy switcher, we can hide IP addresses and perform penetration testing tasks to check how a person can attack with proxy servers.
Add Proxy SwitchySharp to Google Chrome Here.

9) Cookie Editor :
Cookie Editor, is a nice Chrome extension that lets users edit cookies. This tool is really helpful while hijacking vulnerable test sessions. It lets users delete, edit, add/or search cookies. It also lets users protect, block or export cookies in json. You can play with cookies as you want. This extension is ad-supported and all revenue goes to Unicef to help children worldwide. But Ads are not necessary and you can disable anytime from the extension settings page.

  • Add Edit This Cookie to Google Chrome Here.
10 ) Cache Killer :
Cache Killer, is another nice extension that automatically cleans the browser cache before loading pages. It can be easily enabled or disabled with a single mouse click. It’s useful to bypass the browser cache and see the exact website in case it’s changing. This is much useful for web developers.

  • Add Cache Killer Extension to Google Chrome Here.
11) XSS Rays :
XSS Rays, is a nice extension that helps in finding XSS vulnerability in a website. It finds how a website is filtering the code. It also checks for injections and inspects objects. You can also easily extract, view and edit forms non-destructively even if forms cannot be edited. So many penetration testers use this extension as a dedicated XSS testing tool. It’s pure JavaScript XSS scanner. You can read more about XSS Rays here.

  • Add XSS rays to Google Chrome Here
12) WebSecurify:
WebSecurify, is a powerful cross platform web security testing tool. It’s available for various desktop, mobile platforms and browsers. This is the first web security tool that runs directly from the browser. It’s capable of finding XSS, XSRF, CSRF, SQL Injection, File upload, URL redirection and various other security vulnerabilities. It has a built in crawler that scans and crawls pages. Then it will try to find vulnerability on pages. It’s not a fully automatic tool. It lists possible vulnerability on the URL. You will need to confirm the vulnerability manually. We have already covered the websecurify tool in detail. You can check older posts to read more on how this tool works and how to master websecurify for penetration testing. While scanning, it pulls all features from the WebSecurify server, so you do not need to worry about database updates. The vulnerability engine will be updated at all times. Penetration testing tools are just a click away. Use this either as a browser tool or desktop tool.

  • Add Websecurify to Google Chrome Here

13) Port Scanner:
Port Scanner, Google Chrome extension adds port scanning capabilities to the browser. With this extension, you will be able to scan which TCP ports are listening. Port Scanner analyzes any given IP or URL addresses, and then will scan for open ports to help you to secure them. It is also available for Opera and Mozilla Firefox.

  • Add Port Scanner to Google Chrome Here.

14) XSS chef:
XSS chef, is the popular Chrome extension that works directly in the browser. It helps us in identifying XSS vulnerability in a web application. It’s similar to BeEF but for browsers. It performs following tasks:

  1. Monitor open tabs of victims
  2. Execute JS on every tab (global XSS)
  3. Extract HTML, read/write cookies (also httpOnly), local Storage
  4. Get and manipulate browser history
  5. Stay persistent until whole browser is closed (or even further if you can persist in extensions’ local Storage)
  6. Make screenshot of victims window
  7. Further exploit e.g. via attaching BeEF hooks, keyloggers etc.
  8. Explore filesystem through file:// protocol
  9. Bypass Chrome extensions content script sandbox to interact directly with page JS

This is not an extension but a framework. So, installation is not same as any other extension. Read the official link of XSS Chef given below and learn how to install it in Chrome.
  • Add XSS chef to Google Chrome Here.
15) HPP Finder:
HPP Finder, is another nice extension. It is useful in finding HTTP Parameter Pollution (HPP) vulnerability and exploit it. This tool can easily detect and exploit the HTML Forms or URLs that might be susceptible of HTTP Parameter Pollution attacks. This tool can only find the vulnerability points but is not a solution against the vulnerability.

  • Add HPP Finder in Google Chrome Here.

16) The Exploit Database:
The Exploit Database, is not a penetration testing tool, but it keeps you updated with all latest exploits, shell code and white papers available on Exploit DB server. It’s an open source tool and source code can be found Here.
Add The Exploit Database extension in chrome Here.

17) GHDB:
GHDB, is a nice Google hack query search. This nice extension help you in searching for necessary Google hack querys for finding specific pages based on special Google search parameters. It allows you in understanding the basis of web security in a better way.
Add GHDB in Google Chrome Here.

18) iMacros:
iMacros for Chrome, while performing various web page testing processes, you may need to automate few repetitive tasks on the web. For this, you can use iMacros for Chrome extensions. So, next time when you need this kind of thing, Use the macro and then start it with a click button.
Install iMacros for Chrome in Chrome Here.

19) IP Address and Domain Information:
IP Address and Domain Information, is an information gathering extension that can help you in finding geolocation, DNS, whois, routing, search results, hosting, domain neighbors, DNSBL, BGP and ASN information of every IP address (IPv4 and IPv6).
Add it to Chrome Here.

How to Install Chrome Extension in the browser:

Installation of extension is one click process if it is available in the official Chrome store. But it may be confusing if you have extension code only.

Install from Official Chrome store: To install the extension from official chrome store, just click on the link given below each extension and open the chrome store page of the extension. You will see a blue button saying, “Add to Chrome.”

After clicking this button, installation will begin and you will not need to do anything else. It will download a file and then add it to your Chrome. By default, it will activate the extension.

Install Extension manually with source file: Few extensions are not available on official chrome store because they do not meet the terms and conditions of store. So, these are available unofficially on their website. If you want to install those extensions, then download it from the official website. Now open the Chrome extension page and drag the source file and drop it on the extension page. Extension will install automatically after dropping on extensions page.


If you want to deactivate an extension from Chrome, go to settings and then Extensions page. Here you will see the installed extensions. In front of each extension, you will see a check box. To disable the extension, you only need to de-select the select box. To remove the extension permanently, click on the trash icon near the check box.

Friday, July 19, 2013

Transfer Large Files With a Great Upload Speed

If you want to send large files to your friends with a great speed.


Note: Facebook and Gmail does not allow to share large files(max. 25 Mb)

Wednesday, July 17, 2013

How to Unblock Youtube

Many times it happens that in colleges, schools, offices or in hostels where internet connectivity is available but some most popular sites like facebook or youtube are blocked.

So, here i am providing you the 100% working way to unblock these sites. I have discussed that  Unblock Blocked Facebook With Proxy before and now lets crack the youtube.

Unblock Youtube

Tuesday, July 16, 2013

How to Hide IP Address


download fake ip addressPeople often say to me that they don’t like surfing the Internet as they feel every website they go to could hunt them down and knock on their door. Let me tell you this. It is not true.
However, bear in mind, that it is possible to find your location, but they would need a legal case against you to force your Internet Service Provider to hand over your details. However, if you are still worried and would like to surf the web anonymously, you will need to obtain a fake IP address to mask your online identity.
Before I get started, I should mention why people want to use a fake IP address.
  1. They need to test if a web server is correctly configured.
  2. A firewall has blocked them out of their own website, and they need to get back in.
  3. They want to access something that they can’t in their location. For example Google Voice.
  4. They are required to connect to a VPN Network.
There are many more reasons for masking your IP address, but I will not go there. There are a few ways in which you can do this.

Change Your Proxy Settings In Your Web Browser

A quick and easy way is to tell your web browser to use a proxy. So how on earth do you do that? It is quite simple actually. But first of all, you have to find a proxy to connect to. Digital Cyber Soft has an up to date list that you can use.

fake ip address how to

Once you’ve picked one, just enter the settings.
In Firefox: Tools ““> Options ““> Advance ““> Network ““> Settings
fake ip address how to
Then just select Manual proxy configuration and enter the  proxy IP address in HTTP Proxy and the Port number. Hit OK.
In Internet Explorer: Tools ““> Internet Options ““> Connections ““> LAN Settings. Tick Use a proxy server for your LAN and enter the Address and Port number.
fake ip address how to
Hit OK. Once that is done, you can go to CanYouSeeMe and check that your IP is different to the one before you made the changes.

Install GlypeProxy On Your Web Server

If you own a webserver, you can install a free script called GlypeProxy. This script provides you with an admin control panel so you can see what sites visitors have been searching for and other cool features.
By installing it on your own server, you can ensure that no one will be stealing your information, they won’t show you ads and you will be much safer. Before you go ahead and do this, make sure you are allowed to install it by your web hosting provider.
download fake ip address
There is also another script that does not give you an admin panel and that is phpProxy which  you can download at Sourceforge.

Install Software On Your Computer

Another way to mask your IP address or to use a fake one is to install software onto your computer. One such program is Hotspot Shield. It works by you downloading and installing a program onto your computer which creates a Virtual Private Network (or VPN) from your computer directly to one of their servers.

Use Web Proxies

One of the most common and easiest ways to hide your IP address is to use a web proxy. This is exactly the same as what I mentioned before in installing Glypeproxy, but it’s another script on another server. There are thousands of these on the internet, so its just a case of finding one that you like.
Some of the most popular, and better web proxies are:
Please use these sites at your own risk!

Connect to a VPN Network

By connecting to a VPN network such as your workplace or educational institute, when you browse the internet, your external IP address would be the place to which you are connected to. Once you connect to a VPN network, the rules of what you can do on the network will depend on the network you connect to. For example, they may block access to torrents and adult materials through their internet server.
So that is an overview on how you can mask yourself and use a fake IP address. However, please be very careful when you use these services, especially from other websites as you do not know what malicious code they may have put on their sites.
If you use a proxy, which one do you use? If you have any other tips, please tell us in the comments.

Friday, July 12, 2013

Increase Broadband Speed Using Simple Tweak

A Simple Tweak (XP Pro only) which will increase your Broadband Speed.

Make sure you Log on as Administrator, not as a user with Administrator privileges.

Follow the steps as given below-

1) Click on Start Button.

2) Select Run From Start Menu. 

3) Type gpedit.msc 

4) Expand the [Administrative Templates] branch. 

5) Then Expand the [Network] branch. 

6) Highlight(Select by Single Click) [QoS Packet Scheduler] 

7) Double-click [Limit Reservable Bandwidth] (Available in Right Side Panel) 

8) Check(Select By Single Click on it) [Enabled] 

9) Change [Bandwidth limit %] to 0 % 

10) Click [OK] Button. 

11) Restart Your PC.

12) Now Check Your Broadband Speed. 

How to Reveal *****(Asterisk) Passwords Using Javascript

Want to Reveal the Passwords Hidden Behind Asterisk (****) ?

Follow the steps given below-

1) Open the Login Page of any website. (eg. http://mail.yahoo.com) 

2) Type your 'Username' and 'Password'.

3) Copy and paste the JavaScript code given below into your browser's address bar and press 'Enter'.

javascript: alert(document.getElementById('Passwd').value);


4) As soon as you press 'Enter', A window pops up showing Password typed by you..!


Note :- This trick may not be working with firefox

Sunday, July 7, 2013

Important Abbreviations Related To Internet

 FM –> Frequency Modulation
SIM –> Subscriber Identity Module
RIM –> Removable Identity Module
GSM –> Global System For Mobile
LAN –> Local Area Network
WAN –> Wide Area Network
RTE –> Rich Text Format
MAN –> Metropolitan Area Network
URL –> Uniform Resource Locator
ISP –> Inter Net Service Provide
@ –> At The Rate Of
DVD –> Digital Versatile Disk
CD –> Compact Disk
EDGE –> Enhanced Data for GSM Evolution
GPRS –> General Packet Radio Service
FDM –> Frequency Division Multiplexing
SDR –> Software Defined Radio
ATM –> Asynchronous Transfer Mode
DCA –> Dynamic Channel Allocation
FCA –> Fixed Channel Allocation
AMPS –> Advance Mobile Phone System
IMTS –> Improved Mobile Telephone System
CDMA –> Code Division
MultipleAccess
MTSO –> Mobile Telephone Switching
Office
HTTP –> Hypertext Transfer Protocol
FIDI –> Fiber Distributed Data Interface
ISDN –> Integrated Services Digital
Network
PSTN –> Public Switched Telephone Network
CSMA –> Carrier Sense Multiple Access
RADAR –> Radio Detection AndRanging
SONET –> Synchronous Optical Fiber Network
DAMPS –> Digital Advanced Mobile
Phone System
WWW –> World Wide Web
IP –> Internet Protocol
TCP –> Transmission Control Protocol
HTML –> HyperText Markup Language
USB –> Universal Serial Bus
PAN -> Personal Area Network
TDM -> Time Division Multiplexing.

Wednesday, June 26, 2013

20 Awesome Tips About Google Chrome Browser


1. incognito – Secret Mode

Incognito mode is for private browsing, where Chrome doesn't record your browsing history, download history  Any cookies that are stored during the incognito mode is deleted when you close the browser.
You can launch incognito by pressing Ctrl + Shift + N, (or) Settings -> New incognito Window, (or) right mouse-click on a link from a regular Chrome session, and select “open link in incognito window”.
One of the practical use for this mode (apart from private browsing) is to login to the same site using two accounts.
For example, if you have two gmail accounts, login using the first account in your regular Chrome browser, and login using the second account in your Incognito mode on your Chrome browser. This way, you can be logged in to two gmail accounts at the same time on Chrome browser.

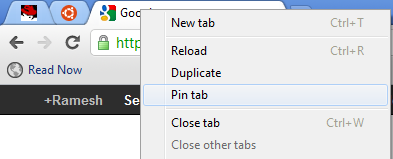
2. Pin Tab

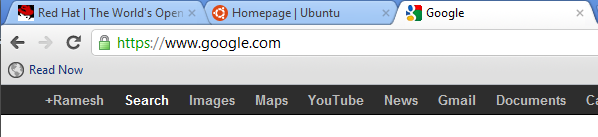
When you pin a tab, it minimizes the tab to display only the icon. When you have several tabs opened, this feature is very helpful, as the Tab title displays only the icon and takes only little real estate.
Before pinning:


After pinning 1st two tabs:

3. Display Home Button

By default, chrome doesn’t display the ‘Home’ button in the toolbar.
Click on the ‘Wrench Icon’ on the right-hand corner of the browser to get to the “Customize” option for Chrome browser -> Preferences (or Options) -> Select the check-box for “Show home button in toolbar”
This will now display the ‘Home’ button in front of the URL field. Click this button to go to your home page quickly.

4. Omnibox

The URL address bar (also called as Omnibox in Chrome) in the Chrome browser is not only to enter your URL. Just type the keyword you want to search and press enter, which will perform a google search.
You can also perform calculations or conversions directly in the Omnibox. Try typing any one of the following in the URL address bar and press enter to see the results yourself.
7 + 200
7 * 200
1 lb in kg
2 miles in km

5. Reopen Recently Closed tab

If you’ve closed a tab by mistake, you can open it by pressing Ctrl + Shift + T, (or) right mouse-click on the empty area in the title-bar -> and select “Reopen closed tab” as shown below.

6. Chrome:// commands

There are various about command that you can type in the address bar.
chrome://histograms
chrome://memory
chrome://cache
chrome://dns
etc.

7. Task Manager

Task manager displays the memory and CPU usage of the Chrome browser, broken down by each and every Tab. If you have multiple Tabs open, and when your system is slow, you can use task manager to identify which Tab is causing the issue.
Right click on empty space in the title bar and select “Task manager”, (or) Press Shift + escape key to launch it as shown below.

8. Change Search Engine in the Omnibar

Type “amazon” in the address bar AND press “Tab”, which will change the address bar to “Search amazon.com:”, any keyword you type after this will be searched in the amazon.com and it will take you to amazon.com website.
You can also change the default search engine. Right click on the address bar -> and select “Edit search engine”. From here you can choose other search engines.

9. Open a link at a specific Tab Location

As you already know, when you right click on a link, and say “Open link in a new tab”, it opens it as a new tab (next to the current open tab).
However, if you want the link to be opened at a specific tab location, you can hold the link, drag it and drop it as a specific tab location. You’ll see a small arrow when you drag and drop the link. In the following example, I tried to drop the link at 2nd tab location.

10. Carry your Chrome Settings with You

If you are using multiple computers (at home, at work, etc.), you don’t need to worry about trying to setup the Chrome browser in the same way on all the computers you use. Instead, setup your bookmarks, extensions, themes, settings, etc, on your Chrome browser on one computer, and select “Sign in to Chrome” from the settings menu as shown below.

This will ask you to enter your google username and password. This will save all your chrome settings on your google account. Next time when you sign-up from another machine, all your chrome settings will be visible on the new system. If you make any changes to your chrome settings on this new system, it will be available on your other computers too. Use this feature only on the systems which you trust and not on public computers.

11. Drag and Drop Downloaded file

Once a file is downloaded, you can just drag and drop the file (from the Chrome download window) to your Windows explore, or any other file browser that you are using on your system.

12. History

Press Ctrl-H, or go to Customize -> History, to launch the history window. From here you can search for a specific website from your history, delete all your history, or delete only selected items from your history.

13. Create a Shortcut of the Current Tab

If you like to create a shortcut to the website that you are currently viewing, go to Customize -> Tools -> Create application shortcuts. This will ask you where you like to create the shortcut for this website, as shown below.

Once you create a application shortcut, next time when you click on it to open it, it will open this site in a Chrome browser without any tabs, url location bar, etc.

14. Navigate Between Tabs Quickly

  • Use Ctrl+Tab to navigate Tabs one by one
  • Press Ctrl-1 to go to 1st Tab
  • Press Ctrl-2 to go to 2nd Tab
  • ..
  • Press Ctrl-9 to switch to the last Tab

15. Resize TextArea

You can also resize a textarea that you see on any website. Please note that you can resize only the textarea and not a textbox. At the bottom right corner of the textarea, you’ll see two slanted lines, use your mouse, hold this, and drag it to resize the textarea on the screen.
You can try this yourself on the comment box (which is a textarea) located at the bottom of this page.

16. Detach a tab

If you have multiple Tabs opened, and like to detach a single tab as a separate Chrome instance, just drag the tab anywhere outside the browser, which will detach the tab and run it in a separate Chrome browser window.

17. Highlight a Text and Search

When you are browsing a website, if you come across some word that you are not familiar with and like to perform a google search on it, just double-click on the text to high-light it, right mouse-click, and select “Search google for”, which will open a new Tab and search for the selected text. This saves some time.

18. Autofill

You can use the autofill option to enter one or more addresses that you can use to fill-up any web forms. You can also use this feature to store one or more credit card information that can be pre-populated on web forms. Don’t use this feature on a computer that you don’t trust.
Go to settings -> Options -> Personal Stuff -> Click on the check-box “Enable Autofill to fill out web forms in a single click” -> Click on Manager autofill settings -> Click on ‘Add new Address’ and enter the information.

19. Google Cloud Print

Go to Settings -> Options -> Under the Hood -> click on sign into “Google Cloud Print”.
Once you setup your printer using Google cloud print, you can print to it from anywhere. i.e You can print to it from your mobile, other PC at work, or any other system that is connected to the internet.

20. Google Chrome Browser Shortcuts

The following are some useful shortcuts:
  • Alt+F – Open the wrench menu (i.e chrome settings menu)
  • Ctrl+J – Go to downloads window
  • Ctrl+H – Go to history window
  • Ctrl+Tab – Navigate Tabs
  • Alt+Home – Go to home page
  • Ctrl+U – View source code of the current page
  • Ctrl+K – To search quickly in the address bar
  • Ctrl+L – Highlights the URL in the address bar (use this to copy/paste the URL quickly)
  • Ctrl+N – Open a new Chrome browser window
  • Ctrl+Shift+N – Open a new incognito window (for private browsing)
  • Ctrl+Shift+B – Toggle bookmark display
  • Ctrl+W – Close the current Tab
  • Alt+Left Arrow – Go to the previous page from your history
  • Alt+Right Arrow – Go to the next page from your history
  • Space bar – Scroll down the current web page